Automating work anniversary reminders for managers using Workday

|
Christian Delcid is a Workday Analyst at Asahi Kasei and has a masters degree in Organizational Leadership. |
Have you seen the Anniversary for Worker card from the new Workday Today redesign?
This card conveniently populates important information for managers about their direct reports. This includes upcoming work anniversary dates as well. Amazing!
While this feature is cool, with a little extra setup, Workday can play a much bigger role in making work anniversaries awesome.
What do we have in mind?
The big picture
At a super high level, we are:
collecting preference information from employees (e.g. favorite candy)
making that preference data available to managers
reminding managers of upcoming work anniversaries
That way, managers will never forget a work anniversary, and can use the preference data to make a small thoughtful gesture, like giving the employee their favorite candy bar!
Here is a high-level diagram of the entire process:

If this sounds intriguing/exciting, let’s jump into it!
Capture employee preferences
In the blog post about onboarding with work anniversaries in mind, we described the value of capturing employee preferences and using them to enable simple but powerfully personalized gestures. Workday can streamline this process. We will do so by creating and utilizing a new Custom Object.
Create a Custom Object and Custom Fields
By setting up a Custom Object on the Workday Worker Business Object, you can define custom fields to collect for each worker. You can then trigger the Edit Worker Additional Data Event business process within the Hire business process to collect that information.
First, you can use the Create Custom Object task to create the new object and new fields. In the Workday Object, you can select Worker or Worker (Effective Dated). Either option should work but select the option that will work best for you and your organization. You can then name the custom object whatever you would like (e.g. Worker Preferences).
In the Create Custom Object wizard, you can confirm your General Settings and click Next. In the Field Definitions, this is where you will define the custom information you would like to collect for your workers. Click the Add button to add as many fields as you would like to collect. For example, you can add text fields for favorite gift card, favorite restaurant, favorite candy, favorite coffee order, etc. Can you imagine the new hire and work anniversary experience you could create with this information?

You will notice that you can add validations and determine the order that these fields appear with the custom object as well. Once this information is entered, you can click Next. This will then allow you to add a security domain to your new object. As an example, you can use Worker Data: Staffing as the domain but you will want to work with your Security Administrator to select the appropriate domain for your organization. After the domain(s) have been selected, click Next, review your custom object data, and click Submit. Congrats! You have now created your Worker Preference Custom Object. Let’s now get it connected to your Hire business process.
Collect worker preferences in the Hire business process
Now that the custom object with the custom fields we want to collect is created, we want to set up the process of triggering the collection of worker data within the Hire process. Before we jump into how to set that up, there is one item I want to address. Ideally, the collection of this new worker preference data would likely live within the Onboarding business process. However, in order to collect this information, we’ll need to use the Edit Additional Data step type within a business process. As of the writing of this blog post, this step type is made available in the Hire business process and not the Onboarding business process. That is why we are configuring this step within the Hire business process and not the Onboarding process. Now that that is out of the way, let’s keep building.
The first step is to work with your Business Process Administrator and/or Security Administrator to make sure the Edit Worker Additional Data Event business process is set up accordingly. This setup will look differently depending on whether your organization is already using this business process and/or if your current business process is using a questionnaire to route to the fields to update.
Regardless, this business process will need an Edit Additional Data step that will specifically allow for the new custom object fields to be updated for the worker. Make sure to add any step conditions on this new step as well, if needed. Your Business Process and Security Administrators will be able to assist with setting that up accordingly.
An aspect to consider at this point is which security group/role will be entering this information into the system. This decision should be configured into the Edit Worker Additional Data Event business process security policy as well. For this blog post, we’ll configure this around the manager being able to enter this data on behalf of the worker.
Now that the Edit Worker Additional Data Event business process includes a step to update the newly created Custom Object and updated security, let’s add a new step to our Hire business process. In Workday, search for the Hire business process, click the related actions icon, hover over Business Process, and click Edit Definition. Enter the Effective Date and click OK. Click the plus icon (+) at the top left corner of the Business Process Steps table to add a new row/step.
Assign the step order for this new step, set the Type field as Edit Additional Data, set the Specify field as your newly added custom object, and assign the security group responsible for entering this data in the Group field. Once this information is entered and confirmed, click OK. Scroll down to the newly added step and make sure that this step is listed in the correct location within the Business Process. Be sure to add any step conditions, if applicable. With these steps added and configured, your Hire business process will now collect your custom data for your new hires moving forward. Like with many of the upcoming steps, it’s always a great idea to test this new step in your Hire business process to make sure the system is behaving as expected.
Create and share an upcoming work anniversaries report with managers
Now that our tenant is configured to start collecting worker preferences, let’s create a custom report that managers can use to view this information alongside their workers’ key work anniversary data. Based on how your organization would like this report to look, you can create this report in one of two ways.
Create the report
The first, and likely easiest, option is to make a copy of the Workday-delivered report called “Anniversaries for this week and next”. You can run the Copy Standard Report to Custom Report task, enter the “Anniversaries for this week and next” into the Standard Report Name prompt, and click OK.
The second option is to create a custom report from scratch and use the Workers business object as your primary business object. You can then select the All Active and Terminated Workers as your Data Source. Now that we are creating this custom report, let’s discuss what fields we’ll want to see.
This report will likely be used by a few different security groups for various reasons. As a result, you will want to be intentional about deciding what fields to include on this report. The Workday-delivered fields that we recommend showing are the following:
Worker
Next Anniversary
Next Anniversary in Years
Manager – Level 01
Location
Job Family
So far, all the fields being used in this report are Workday delivered but we will now want to add in the custom field(s) that we are now collecting for each worker to this report as well.
To do so, you will want to create a new lookup related value (LRV) calculated field on the Worker Business Object. When creating this new LRV field, select Worker Additional Data as your lookup field, Worker Custom Data Snapshot as the Related Business Object, and the name of your custom field as your Return Value (see picture below).
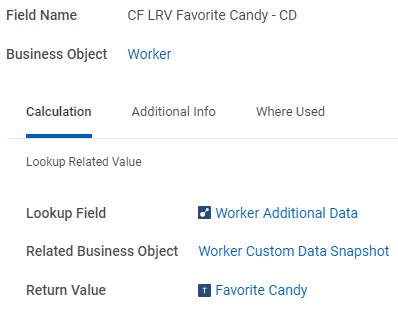
Keep in mind that this LRV field only captures one field within your newly created custom object. If you have more than one field that your organization is looking to share on this report, you will want to create a LRV field for each of those custom fields and enter each of the field names as the return value. Once all your LRV fields are created on the Worker Business Object, add those fields to your work anniversary report.
You will want to connect with the key members of your Workiversary and/or HR team to decide on other fields should be on this report, what prompts to add, how to define upcoming work anniversaries and apply that timeline to the filters, and who to share all this information with. Once you have a clear report and use in mind, make sure that you add any prompts, adjust/double-check your filters, and share the report with the correct individuals and/or groups.
Like with earlier steps, make sure you take the time to test the results of your custom report. Remember, you can use Workday-delivered “Anniversaries for this week and next” report to cross-reference against your new custom work anniversary report. The result will look like the picture below:

Here’s the report definition: Upcoming_Work_Anniversaries_Report
Automatically email the report to managers
Now that our Work anniversary report is created and tested, let’s work on creating an automated alert in Workday and email notification for your managers. If you have ever configured an alert based on a report, you will know how useful this functionality can be. That is exactly what we will do for this newly created report as well.
First, search for your new Work anniversary report in Workday. Click the related actions icon, hover over Custom Report, and click the Configure Alert task. You can also get to this task directly by searching Configure Alert. Within the prompt, enter the desired alert frequency you want to alert your managers. We recommend a Weekly Reoccurrence. Once selected, click OK.
Within the Configure Alert task, give your alert a name. Under the Notification Type section, select the appropriate notification type. If you are not sure which option to select, you can run Edit Tenant Setup – Notifications, scroll down to Notification Delivery Settings, and click the Alerts tab. Regardless of which type you select, you will want to make sure that the type does allow an email to go out and it is not muted by default.
In the Recipients section of the Configure Alert task, enter Manager in the Groups field. Immediately below this section, you can enter the Reply To email address as well. Now, we can get to the actual email subject and message that the manager will see as an email and Workday notification.
Below is an example message that you can use to notify your managers of their upcoming work anniversaries as well as a table for configuring this notification. Please feel free to customize and edit it to fit your organization:
| Field Name | Value |
|---|---|
| Notification Subject | Upcoming Work Anniversaries for Your Team |
| Introductory Comments |
Hi there, Work Anniversaries are an incredible opportunity to show appreciation and to create a memorable work experience for your employee(s). Below are the upcoming work anniversaries for your team as well as some ideas for how to celebrate: |
In the Details table, you can enter the below values (keep spaces in mind for the Text selections):
| Selection | Field/Text |
|---|---|
| Field | Line Break |
| Field | Worker |
| Text | - Celebrating |
| Field | Next Anniversary in Years |
| Text | year(s) on |
| Field |
Next Anniversary (You can also use a Format Date Custom Calculated Field in place of the Next Anniversary field here) |
| Text | . Their favorite candy is |
| Field | Enter your custom LRV Calculated Field here |
| Field | Line Break |
In the Sort By table, you can enter the below value:
| Field | Sort Ascending / Sort Descending |
|---|---|
| Next Anniversary in Years | Sort Descending |
In the Concluding Comments textbox, you can enter the below value:
| Field Name | Value |
|---|---|
| Concluding Comments |
Feel free to use this information to make these anniversaries special for your employee(s). If it helps, here are some tips that can help you in this process: Reach out - Reach out first thing on the exact day. If it falls on a day they won’t be working, then reach out the day before. Always find a way to reach them. Live in-person or on video is best. If that’s not possible, a voice call is the next best. If you can’t talk to them, text them. Email is a last resort, but far better than missing the day. Make them feel safe - Remember that everyone is insecure. In your communication make sure your words and non-verbals telegraph that you value them, you’re glad they’re at the organization, and they’re safe at the organization. Make it special - You know your team best, but here are some ideas to consider if they make sense for your team. Small gestures that show you know them, like giving them their favorite candy bar, go a long way. One-on-ones entirely focused on what they want from the year ahead can be meaningful. Or, going out for a work anniversary celebration team lunch can help a team bond (as long as no one's work anniversary is forgotten). Thanks for your contribution in making CompanyXYZ an awesome place to work. If you have any questions, please feel free to send an email to HR@Company.com. Thanks again, The Workiversary Team |
The result of these notifications will look something like the below. Keep in mind that there might already be an alert configured related to Work Anniversaries. You can run reports like Scheduled Future Processes or Process Monitor to see what scheduled processes your organization currently has running, to avoid any duplicate or conflicting alerts.
Email example:

Workday notification:

Handle missing preferences
Up to this point, we are collecting worker preferences on the Hire business process, reporting on that collected data on our custom work anniversary report, and are sending a weekly notification to managers about upcoming work anniversaries and worker preferences. From this point on, this is covering all our new hires. What about our existing employee base that have not yet shared their preferences?
To go back and collect the worker preference data and input that data into Workday, we can create another custom report, configure another alert, and revisit the Edit Additional Worker Data business process. We will begin with the custom report. Luckily, we do not have to start from scratch here. We can make a copy of our recently created work anniversary report and fine tune it a bit.
Create a missing preferences report
Search for your upcoming work anniversaries report, click the related actions, hover over Custom Report, and click the Copy option. Give your new report a good name (Ex. Workers Missing Preferences Report). Once created, all we will need to do with the new report is to adjust the filters. Instead of having the work anniversary data as the key data in this report, we primarily want to draw attention to the missing worker preference data instead. We can keep the same fields, but it may help to reorder this data. Below is an example of an order that might help do just that:
Worker
LRV Calculated Field(s) contain Worker Preference(s)
Manager – Level 01
Location
Job Family
Next Anniversary
Next Anniversary in Years
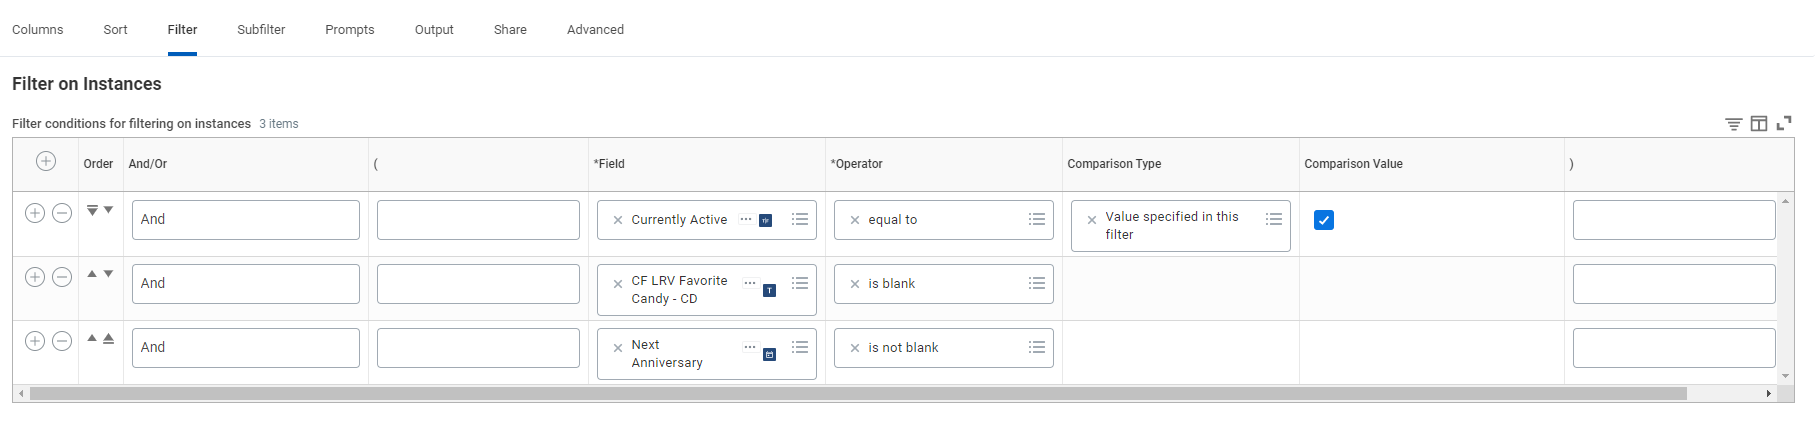
Again, we will primarily want to focus on any missing worker preference data. On the Filter tab, we can remove the two filters related to the Next Anniversary field. We will keep the filter on Active workers since we only want to see active workers on this report. Add a new row to your filters table, and enter the following filter:
| Field Name | Entry Value |
|---|---|
| Field | [Your LRV Calculated Field] |
| Operator | is blank |
As we did in previous steps, we will want to repeat the filter row based on the number of custom fields we have on the report. If you are filtering on more than one custom field, make sure that your And/Or and parentheses logic is correct on this tab. Below is a screenshot of the filters tab on our report. As always, be sure to share your new report with the appropriate security groups and test your report thoroughly.
Note that I am using an additional filter (see below). Due to our configuration, this filter helps to limit the workers that show up on this report to their supervisory organization. You can work with your Security and Report administrators to mirror or customize this report more, if you would like. Remember to test this report thoroughly before moving to the next step.
The result will look something the like the image below:

Here’s the report definition: Workers_Missing_Preferences_Report
Email managers about missing preferences
Now that our Worker Missing Preferences report is now up and running, we will work to configure an alert around this data to send to our managers. Search for your Workers Missing Preferences report in the system. Click the related actions icon, hover over Custom Report, and click the Configure Alert task. You can also get to this task directly by searching Configure Alert. Within the prompt, enter the desired alert frequency you want to alert your managers. We recommend a Monthly Recurrence. Once selected, click OK.
Within the Configure Alert task, give your alert a name. Under the Notification Type section, select the appropriate notification type. In the Recipients section of the Configure Alert task, enter Manager in the Groups field. Immediately below this section, you can enter the Reply To email address as well.
Now, we can get to the actual email subject and message that the manager will see as an email and Workday notification. Below is an example message that you can use to notify your managers of their workers with missing preference data as well as a table for configuring this notification. You know your managers best, please feel free to customize and edit it to fit your organization:
| Field Name | Value |
|---|---|
| Notification Subject | Workers Missing Preference Data |
| Introductory Comments |
Hi there, Work Anniversaries are an incredible opportunity to show appreciation and to create a memorable work experience for your employee(s). However, there are a few of your employees that we do not have preference data for. These employees are listed below: |
In the Details table, you can enter the below values (keep spaces in mind for the Text selections):
| Selection | Field/Text |
|---|---|
| Field | Line Break |
| Field | Worker |
| Text | - Celebrating |
| Field | Next Anniversary in Years |
| Text | year(s) on |
| Field |
Next Anniversary (You can also use a format Date Calculated Field in place of the Next Anniversary field here) |
| Field | Line Break |
In the Sort By table, you can enter the below value:
| Field | Sort Ascending / Sort Descending |
|---|---|
| Next Anniversary | Sort Ascending |
In the Concluding Comments textbox, you can enter the below value:
| Field Name | Value |
|---|---|
| Concluding Comments |
This information will only take 5 minutes to collect and it will help create a personalized experience for your employees on their work anniversary. Can you ask the following question(s) during your next 1-on-1? • What's your favorite candy or other snack? • What's your favorite color? • What's your favorite restaurant near the office? Once you gather this information, you can enter this information on the employee’s profile in Workday by following these steps: [Insert steps here] Thanks for your contribution in making CompanyXYZ an awesome place to work. If you have any questions, please feel free to send an email to HR@CompanyXYZ.com. Thanks again, The Workiversary Team |
Email example:

Workday notification:

Perfect! We are now notifying managers monthly of the workers that are missing preference data and we are asking them to collect that information during their one-on-one with those workers. What should happen after those awesome, fun, and maybe random conversations? Let’s dig into the Edit Worker Additional Data Event business process and discuss how that will play into the rest of the data collection process.
As mentioned in the beginning of the blog post, you will want to work with your Business Process Administrator and/or Security Administrator to make sure the Edit Worker Additional Data Event business process is set up accordingly. This setup and process will look differently depending on whether your organization is already using this business process and/or if your current business process is using a questionnaire to route to the fields to update.
Whichever group is responsible for entering this data into Workday will be able to go to the worker’s profile, click the actions button, hover over Additional Data, and click Edit Effective-Dated Custom Object. From here, the process will look different based on how this business process is configured for your tenant. Your security and/or business process administrators will be able to outline the remaining steps after that. We recommend defining clear instructions to provide your managers within the previous alert email and notification.
Now, your active, non-new hire workers are covered as well and will get a chance to share their preferences for that data to be entered into Workday. That data will then be part of the weekly automated report/notification to managers.
The big picture revisited
Now that we have this incredible configuration setup within Workday, let us take a look at that diagram again (see below).
As you can see, our new hires will have their preferences collected through the Hire Business Process. Our current, non-new hire workers will be listed on the Workers Missing Preferences Report and monthly notification to managers. Managers can then enter that information into the workers profile. All workers will then be listed on the Upcoming Work Anniversary Report, along with the worker preference data. The cumulation of the process will empower your managers and leaders to create personal, memorable, and connecting work anniversaries at your organization.
You can make a big difference
While implementing the changes described in this article will take a little effort, you will be enabling thousands of positive experiences year after year that wouldn’t have happened without you.
Managers at your organization are well intentioned but busy. They want to create great experiences for their employees but, sometimes, other tasks take priority or time is short. With your help, awesome work anniversaries do not have to be an afterthought and they don’t have to be a pain.
With Workday, you can take the leg work out of work anniversaries and you empower your managers to create personalized experiences that your employees will remember and rave about.
Looking to go beyond WorkDay and do something especially meaningful (but still low-cost and low-effort) on big milestones?

The world’s most meaningful work anniversary gift